![]()
7. Create a Simple Flask App#
Note
You can clone the source code here
Flask is a micro web framework written in Python. It’s considered a micro framework because it does not require particular tools or libraries, but it’s expandable and can support complex applications as well. It has a very small and easy-to-understand code base, and provides only a few essential components out of the box, such as routing, request handling, and HTML templating. However, it’s highly extensible and allows you to add more functionality through extensions and libraries, including database integration, form validation, authentication, and more.
Here’s why you might want to choose Flask for your web development project:
Simplicity and Ease of Use: Flask is very simple to set up and use. It’s a good choice if you’re new to web development, if you’re a solo developer, or if you’re working on a small project. The Flask documentation is very comprehensive and easy to understand.Flexibility: Flask is very flexible. It doesn’t make many decisions for you, which means you have the freedom to structure your application however you like and use whatever libraries or tools you prefer. This is a contrast to more “batteries-included” frameworks, like Django, which come with more built-in tools but are also more prescriptive.Lightweight: Flask is lightweight and has a small footprint, meaning it uses less system resources and can run efficiently on small servers.Extensibility: Even though Flask is lightweight and simple, it can be extended with various extensions to add functionalities such as SQL databases, authentication, form handling, and more. This makes it a good choice for both simple and complex projects.Community and Ecosystem: Flask has a large and active community of developers, so it’s easy to find help when you need it. There are many tutorials, guides, and examples available, as well as a large number of libraries and extensions.Integration with Python ecosystem: Since Flask is a Python framework, you have access to the vast Python ecosystem and all its libraries for tasks such as data analysis, machine learning, and more.
Overall, Flask provides a nice balance between simplicity, flexibility, and power, which makes it a popular choice for web development in Python. Creating a Flask application usually requires two primary files: an app.py file which will contain your application’s code, and a requirements.txt file to list any dependencies your application might have. In this case, our Flask application will be very basic and will just display a “Hello, World!” message when someone accesses it.
python_cources_for_beginners/
└── Mini Project 2/
    ├── requirements.txt
    └── app.py
Here’s what those files might look like:
app.py:
from flask import Flask
app = Flask(__name__)

@app.route('/')
def hello_world():
    return 'Hello, World!'

if __name__ == '__main__':
    app.run(debug=True)
This is a very simple Flask application. The app = Flask(__name__) line creates an instance of the Flask class for our application. The @app.route('/') line is a decorator that Flask provides to route web requests to particular functions. The hello_world function is mapped to the root URL (‘/’) and returns the string 'Hello, World!'. Finally, app.run(debug=True) runs the application (in debug mode in this case).
2. `requirements.txt`:
Flask ==2.0.1
This file lists Flask as a dependency for our application. This is useful if we’re sharing our code with others or deploying it to a production environment. Someone can use the command pip install -r requirements.txt to install all the dependencies listed in this file.
Please replace Flask==2.0.1 with the version of Flask we are currently using.
We can run the application locally by using the terminal and typing python app.py, assuming you have Python and Flask installed. We can see output telling us that a server is running locally, and we can access it by opening a web browser and navigating to http://127.0.0.1:5000/ or http://localhost:5000/. We should see ‘Hello, World!’ displayed.
Render HTML content in Flask#
To render HTML content in Flask, we typically use templates. Flask configures the Jinja2 template engine by default. Let’s add an HTML file to our project:
First, create a new directory named templates in our project’s root directory. Flask looks for templates in this directory by default.
Then, create a new HTML file in this directory. Let’s call it index.html:
<!DOCTYPE html>
<html>
    <head>
        <title>Hello, World!</title>
    </head>
    <body>
        <h1>{{ message }}</h1>
    </body>
</html>
In this HTML file, {{ message }} is a placeholder for a variable that we’ll pass from your Flask application.
Now, we need to update our
app.pyfile to use this template:
from flask import Flask, render_template
app = Flask(__name__)

@app.route('/')
def hello_world():
    return render_template('index.html', message='Hello, World!')

if __name__ == '__main__':
    app.run(debug=True)
In this updated app.py file, render_template('index.html', message='Hello, World!') tells Flask to find a template called index.html and fill in the {{ message }} placeholder with ‘Hello, World!’.
We don’t need to change our
requirements.txtfile, as Flask includes the Jinja2 template engine by default. When we run our application and visithttp://127.0.0.1:5000/orhttp://localhost:5000/, we should now see our message (‘Hello, World!’) displayed as an H1 heading on an HTML page.
Flask Form#
We can create a form in a new HTML file, and then we’ll write a Flask route and function to handle form submissions. We’ll convert the submitted text to lowercase, as you’ve requested. Here’s how:
First, create a new HTML file in our
templatesdirectory. Let’s call itform.html:
<!DOCTYPE html>
<html>
    <head>
        <title>Submit Text</title>
    </head>
    <body>
        <form method="POST">
            <label for="text">Enter your text:</label><br>
            <input type="text" id="text" name="text"><br>
            <input type="submit" value="Submit">
        </form>
    </body>
</html>
This file contains a form that sends a POST request when submitted. The form includes a text input where users can enter their text.
Next, we need to update our
app.pyfile to include a new route and function for displaying the form and handling form submissions:
from flask import Flask, render_template, request
app = Flask(__name__)

@app.route('/')
def hello_world():
    return render_template('index.html', message='Hello, World!')

@app.route('/form', methods=['GET', 'POST'])
def render_form():
    if request.method == 'POST':
        text = request.form.get('text')
        return render_template('index.html', message=text.lower())
    return render_template('form.html')

if __name__ == '__main__':
    app.run(debug=True)
In this updated app.py file, we’ve added a new route for ‘/form’. If the request method is ‘POST’ (which means the form is being submitted), we get the submitted text, convert it to lowercase, and then pass it to our index.html template. If the request method is ‘GET’ (which is the default method when a user visits the page), we just display the form.
Now, if you run your application and visit http://127.0.0.1:5000/form or http://localhost:5000/form, you should see the form. If you submit some text, you should then see your submitted text displayed in lowercase on a new page.
Add CSS file to flask#
Let’s add some CSS to make our application look nicer.
First, create a new directory named static in your project’s root directory. Flask serves static files (like CSS files) from this directory.
Then, create a new CSS file in this directory. Let’s call it style.css:
body {
    background-color: #f0f0f0;
    font-family: Arial, sans-serif;
    padding: 30px;
}

form {
    background-color: #fff;
    padding: 20px;
    border-radius: 5px;
    max-width: 600px;
    margin: 0 auto;
}

input[type="text"] {
    width: 100%;
    padding: 10px;
    margin: 10px 0;
    box-sizing: border-box;
}

input[type="submit"] {
    background-color: #4CAF50;
    color: white;
    padding: 10px 20px;
    border: none;
    border-radius: 4px;
    cursor: pointer;
}

input[type="submit"]:hover {
    background-color: #45a049;
}

h1 {
    text-align: center;
}
This CSS file includes some styles to make our application look a little nicer.
Next, we need to update our HTML files to include this CSS file:
index.html:
<!DOCTYPE html>
<html>
    <head>
        <title>Hello, World!</title>
        <link rel="stylesheet" type="text/css" href="{{ url_for('static', filename='style.css') }}">
    </head>
    <body>
        <h1>{{ message }}</h1>
    </body>
</html>
form.html:
<!DOCTYPE html>
<html>
    <head>
        <title>Submit Text</title>
        <link rel="stylesheet" type="text/css" href="{{ url_for('static', filename='style.css') }}">
    </head>
    <body>
        <form method="POST">
            <label for="text">Enter your text:</label><br>
            <input type="text" id="text" name="text"><br>
            <input type="submit" value="Submit">
        </form>
    </body>
</html>
In each HTML file, the line <link rel="stylesheet" type="text/css" href="{{ url_for('static', filename='style.css') }}"> tells Flask to include our CSS file.
Now, if we run our application and visit http://127.0.0.1:5000/ or http://localhost:5000/form, we should see our pages styled with the CSS we’ve created.
We can return the text on the page under the form. We will need to modify the form.html and app.py files.
form.html:
<!DOCTYPE html>
<html>
   <head>
       <title>Submit Text</title>
       <link rel="stylesheet" type="text/css" href="{{ url_for('static', filename='style.css') }}">
   </head>
   <body>
       <form method="POST">
           <label for="text">Enter your text:</label><br>
           <input type="text" id="text" name="text"><br>
           <input type="submit" value="Submit">
       </form>
       {% if message %}
       <div id="result">
           <h2>Submitted Text (in lowercase):</h2>
           <p>{{ message }}</p>
       </div>
       {% endif %}
   </body>
</html>
In this file, {% if message %}…{% endif %} is a conditional statement in Jinja2 template engine that checks if the message variable exists. If it does, it displays a div containing the submitted text.
app.py:
from flask import Flask, render_template, request
app = Flask(__name__)

@app.route('/')
def hello_world():
   return render_template('index.html', message='Hello, World!')

@app.route('/form', methods=['GET', 'POST'])
def render_form():
   message = ''
   if request.method == 'POST':
       text = request.form.get('text')
       message = text.lower()
   return render_template('form.html', message=message)

if __name__ == '__main__':
   app.run(debug=True)
In this updated app.py file, we’ve moved the render_template function out of the if statement. Now, it runs whether the request method is ‘GET’ or ‘POST’. When the method is ‘POST’, we get the submitted text, convert it to lowercase, and pass it to our form.html template as the message variable. When the method is ‘GET’, we pass an empty string as the message variable.
Upon the completion of this project, our Flask application will have the capability to accept user input through a form. This user-submitted text can be processed in three distinct ways, determined by the selection of one of three buttons: transforming the text to all uppercase, converting it to all lowercase, or computing the word count of the input. This interactive functionality will be seamlessly integrated into our application through the use of CSS for styling and HTML for structuring our web pages.
python_cources_for_beginners/
├── images/
│   ├── flask_page.png
└── Mini Project 2/
    ├── static/
    │   ├── images/
    │   │   ├── flask_page.png
    │   └── style.css
    ├── templates/
    │   ├── form.html
    │   └── index.html
    └── app.py
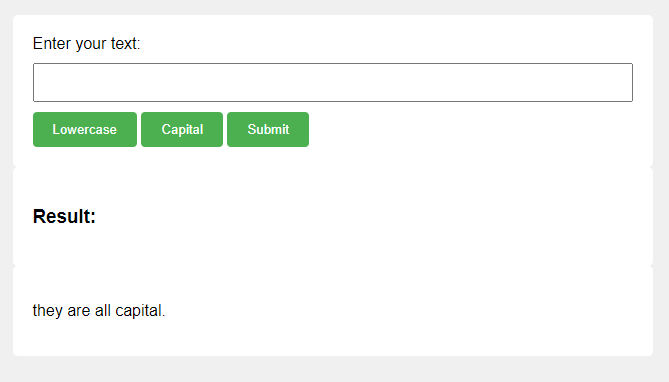
Fig. 3 web page#