HTML to Image Conversion - Complete Guide
What Was Done
Successfully converted all 4 HTML architecture diagrams to high-quality PNG images and updated the blog post to use images instead of iframes.
Created Files
PNG Images (4 diagrams)
- hierarchical-diagram.png (37KB) - 900x700px
- peer-to-peer-diagram.png (77KB) - 900x700px
- pipeline-diagram.png (44KB) - 1000x800px
- production-architecture.png (58KB) - 1200x1000px
Conversion Scripts
- convert-to-images.ps1 - PowerShell script using Chrome headless
- convert-to-images.js - Node.js script using Puppeteer (alternative)
- IMAGE-USAGE.md - Documentation for image usage
How Images Were Created
Used Google Chrome in headless mode via PowerShell:
chrome.exe --headless --screenshot=output.png --window-size=900,700 file:///diagram.html
Blog Post Changes
Updated _posts/2025-12-29-multi-agent-architecture-google-cloud.md:
Before (iframes):
<div style="text-align: center; margin: 30px 0;">
  <iframe src="/images/blog/multi-agent-gcp/hierarchical-diagram.html"
          width="100%" height="600px" frameborder="0">
  </iframe>
</div>
After (images):
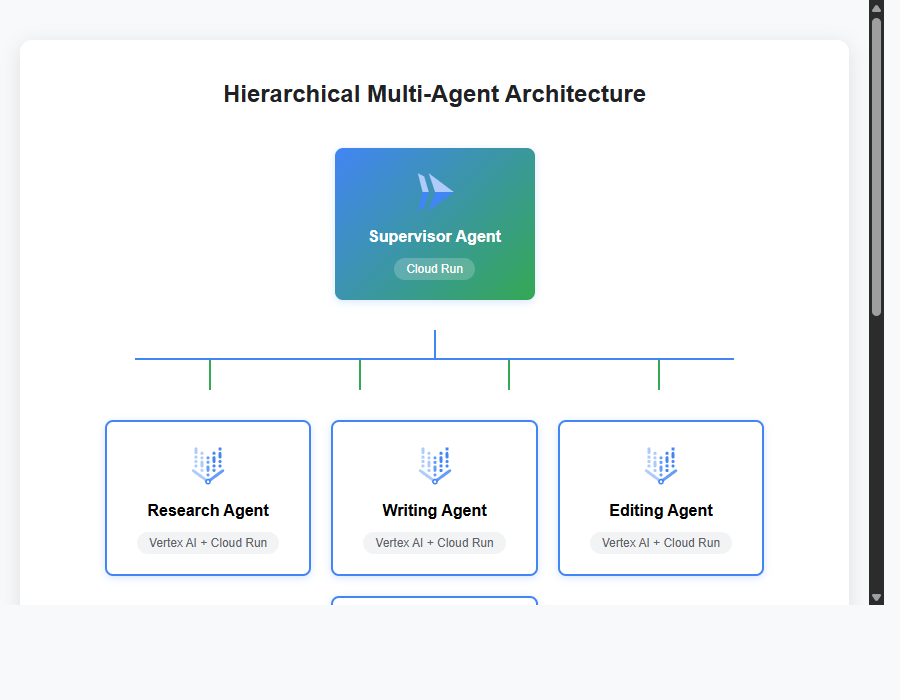
*Hierarchical Multi-Agent Architecture with Google Cloud Services - supervisor agent coordinating worker agents via Cloud Run and Cloud Tasks*
Benefits of Using Images
✅ Performance: Faster page load, no iframe overhead ✅ SEO: Search engines can index and display images in results ✅ Social Media: Better link previews on Twitter, LinkedIn, Facebook ✅ RSS Feeds: Works in email clients and feed readers ✅ Accessibility: Native alt text support for screen readers ✅ Mobile: Better responsive behavior on small screens ✅ Print: Images render properly when printing pages
Methods to Convert HTML to Images
Option 1: PowerShell + Chrome (Used)
.\convert-to-images.ps1
- ✅ No installation needed (uses Chrome)
- ✅ Fast and simple
- ❌ Basic screenshot only
Option 2: Node.js + Puppeteer
npm install puppeteer
node convert-to-images.js
- ✅ High-quality screenshots
- ✅ Better control (wait for animations, high DPI)
- ❌ Requires Node.js installation
Option 3: Online Tools
Option 4: Browser DevTools
- Open HTML file in browser
- Press F12 → Console
- Run:
document.body.requestFullscreen() - Press Ctrl+Shift+P → “Screenshot” → “Capture full size screenshot”
Further Optimization (Optional)
To reduce file sizes by 60-70% without quality loss:
Using TinyPNG (Online)
- Go to https://tinypng.com/
- Upload PNG files
- Download optimized versions
Using ImageMagick (Command Line)
magick hierarchical-diagram.png -quality 85 hierarchical-diagram-opt.png
Convert to WebP (Modern Format)
magick hierarchical-diagram.png hierarchical-diagram.webp
Then use both formats in markdown:
<picture>
  <source srcset="/images/blog/multi-agent-gcp/hierarchical-diagram.webp" type="image/webp">
  <img src="/images/blog/multi-agent-gcp/hierarchical-diagram.png" alt="Architecture">
</picture>
File Structure
images/blog/multi-agent-gcp/
├── README.md                          # Original documentation
├── IMAGE-USAGE.md                     # Image usage guide
├── convert-to-images.ps1             # PowerShell conversion script
├── convert-to-images.js              # Node.js conversion script
│
├── hierarchical-diagram.html          # HTML source
├── hierarchical-diagram.png           # ✨ Generated image
│
├── peer-to-peer-diagram.html
├── peer-to-peer-diagram.png           # ✨ Generated image
│
├── pipeline-diagram.html
├── pipeline-diagram.png               # ✨ Generated image
│
├── production-architecture.html
├── production-architecture.png        # ✨ Generated image
│
└── *.svg                             # Google Cloud icons
Next Steps
- ✅ Images created and blog post updated
- Optional: Optimize images with TinyPNG to reduce size
- Optional: Generate WebP versions for better compression
- Test the blog post locally with
bundle exec jekyll serve - Commit and push changes to GitHub
Testing
View your blog post at:
- Local: http://localhost:4000/2025/12/29/multi-agent-architecture-google-cloud.html
- Live: https://byambaa1982.github.io/2025/12/29/multi-agent-architecture-google-cloud.html
The images should load quickly and display correctly on all devices!